Skip to content

networking

Using a Raspberry Pi 4 as a router with iptables

Using a Raspberry Pi 4 as a router with iptables. With iptables we need to know more about what we are doing. ufw is great, it works as a leayer on top of iptables for with easy management, however you will not learn the real "thing", the network flow details, the beauty of "source" and "destination", and more...

So, I want to learn more, therefore I went on to learn the details of iptables and source destination IPs, NAT (MASQUERADE), source and destination ports, states...

the raspberry pi 4 basics

raspberry pi 4 updates

apt update && apt upgrade -y

apt autoremove -y

## useful

apt install dnsutils

raspberry pi 4 disable ipv6 at boot

vim /boot/cmdline.txt and add ipv6.disable=1 to the end of the line

example

console=tty1 root=PARTUUID=xxxxXXxx-xx rootfstype=ext4 fsck.repair=yes rootwait ipv6.disable=1

raspberry pi 4 enable IPv4 forward and disable IPv6

  • cat /etc/sysctl.d/local.conf
net.ipv4.ip_forward=1

net.ipv6.conf.all.disable_ipv6 = 1
net.ipv6.conf.default.disable_ipv6 = 1
net.ipv6.conf.lo.disable_ipv6 = 1

raspberry pi 4 nat with iptables

  • cat reset-iptables.sh
#!/bin/bash -x
##
## source - https://www.linode.com/docs/guides/linux-router-and-ip-forwarding/
##
## 2023-06 - adapted and tweaked by AntonioFeijaoUK
##

## reset iptables
iptables -F
iptables -X
iptables -t nat -F
iptables -t nat -X
iptables -t mangle -F
iptables -t mangle -X
iptables -P INPUT ACCEPT
iptables -P OUTPUT ACCEPT
iptables -P FORWARD ACCEPT

## enable forwarding packets
iptables -A FORWARD -j ACCEPT

## detecting the default route interface
GATEWAY_INTERFACE=$(route -n | grep ^'0.0.0.0' | rev | cut -f 1 -d ' ' | rev | head -n1)
echo "your gateway interface is : ${GATEWAY_INTERFACE}"

## enable NAT on the outside interface for the internal subnet SOURCE_SUBNET
SOURCE_SUBNET="192.168.0.0/24"
iptables -t nat -s ${SOURCE_SUBNET} -I POSTROUTING -o ${GATEWAY_INTERFACE} -j MASQUERADE

## other good sources with details info
# - https://raspberrytips.com/raspberry-pi-firewall/
# - https://www.packetswitch.co.uk/raspberry/
## - enabled established connections - this is not needed as the FORWARD is set to default ACCEPT
#iptables -A FORWARD -i eth0 -o wlan0 -m state --state RELATED,ESTABLISHED -j ACCEPT
#iptables -A FORWARD -i eth0 -d ${SOURCE_SUBNET} -m state --state RELATED,ESTABLISHED -j ACCEPT
#iptables -A FORWARD -i wlan0 -o eth0 -j ACCEPT

## save IPv4 iptables
iptables-save | sudo tee /etc/iptables/rules.v4


##################################################################
### similar but for IPv6 and to block by default
ip6tables -F
ip6tables -X
ip6tables -t nat -F
ip6tables -t nat -X
#ip6tables -t mangle -F
#ip6tables -t mangle -X
ip6tables -P INPUT DROP
ip6tables -P OUTPUT DROP
ip6tables -P FORWARD DROP

## enable forwarding packets
ip6tables -A FORWARD -j DROP

## enable NAT on the outside interface
#iptables -t nat -s 192.168.0.0/24 -I POSTROUTING -o enp0s3 -j MASQUERADE

## save IPv6 iptables
ip6tables-save | sudo tee /etc/iptables/rules.v6


## USEFUL COMMANDS

echo "

useful command to check your NAT MASQUERADE is working

    \`iptables -t nat -L -nv\`

"

raspberry pi 4 static IP, dhcp and gateway metrics

  • cat /etc/dhcpcd.conf | egrep -v '^#|^$'
hostname
clientid
persistent
option rapid_commit
option domain_name_servers, domain_name, domain_search, host_name
option classless_static_routes
option interface_mtu
require dhcp_server_identifier
slaac private
interface wlan0
metric 300
static domain_name_servers=94.140.14.15 94.140.15.16
interface eth0
domain antoniofeijaouk.local
search antoniofeijaouk.local
metric 200
static ip_address=192.168.0.4/24
static routers=192.168.0.1
static domain_name_servers=94.140.14.15 94.140.15.16

raspberry pi 4 - verify the dns upstream servers

resolvconf -l

resolvectl status

Happy learning,
Antonio Feijao UK

Raspberry Pi 4 as a router with ufw rules

Raspberry Pi 4 as a basic "router" with ufw rules.

requirements

  • update rpi
apt update && apt upgrade -y

apt autoremove -y

apt install ufw

## useful

apt install dnsutils
  • raspberry pi 4 disable ipv6 at boot

vim /boot/cmdline.txt and add ipv6.disable=1 to the end of the line

example

console=tty1 root=PARTUUID=xxxxXXxx-xx rootfstype=ext4 fsck.repair=yes rootwait ipv6.disable=1
  • vim /etc/default/ufw
DEFAULT_FORWARD_POLICY="ACCEPT"
  • cat /etc/sysctl.d/local.conf
net.ipv4.ip_forward=1

net.ipv6.conf.all.disable_ipv6 = 1
net.ipv6.conf.default.disable_ipv6 = 1
net.ipv6.conf.lo.disable_ipv6 = 1

raspberry pi 4 nat with ufw

  • vim /etc/ufw/before.rules
(...)
#------------------------------------------------------------------------
## sources
## https://gist.github.com/kimus/9315140
## https://www.server-world.info/en/note?os=Ubuntu_22.04&p=ufw&f=2
#
# add to the end
# NAT
*nat
-F
:POSTROUTING ACCEPT [0:0]

# Forward traffic through wlan0
-A POSTROUTING -s 192.168.0.0/24 -o wlan0 -j MASQUERADE

# don't delete the 'COMMIT' line or these nat table rules won't
# be processed
COMMIT

sample of basic ufw rules

  • eth0 - "internal" network with static IP

    • metric 300, for lower priority for default gw
  • wlan0 - "external" network with DHCP

    • metric 200, for default gw priority
## in routes - FROM and TO rules

ufw allow from 192.168.0.0/24 to 192.168.0.0/24 port 22 proto tcp


## out rules

ufw allow out on wlan0 from 192.168.0.0/24 to 94.140.14.15 port 53 proto udp

ufw allow out on eth0 from 192.168.0.0/24 to 94.140.14.15 port 53 proto udp

ufw allow out on wlan0 from 192.168.0.0/24 to any port 443 proto tcp
ufw allow out on eth0 from 192.168.0.0/24 to any port 443 proto tcp

ufw allow out from 192.168.0.0/24 to any port 443 proto tcp
ufw allow out from 192.168.0.0/24 to any port 80 proto tcp


## enable ufw logging

ufw logging on

other usefull ufw commands

# ufw reset

ufw disable

ufw enable

ufw status numbered

ufw delete RUL_NUM

raspberry pi 4 static IP, dhcp and gateway metrics

  • cat /etc/dhcpcd.conf | egrep -v '^#|^$'
hostname
clientid
persistent
option rapid_commit
option domain_name_servers, domain_name, domain_search, host_name
option classless_static_routes
option interface_mtu
require dhcp_server_identifier
slaac private
interface wlan0
metric 200
static domain_name_servers=94.140.14.15 94.140.15.16
interface eth0
domain feijaouk.local
search feijaouk.local
metric 300
static ip_address=192.168.0.4/24
static routers=192.168.0.1
static domain_name_servers=94.140.14.15 94.140.15.16

raspberry pi 4 - verify the dns upstream servers

resolvconf -l

Happy learning,

Antonio Feijao UK

2023-06-09-raspberry-pi-4-as-a-router-with-ufw-rules.md

AWS advanced networking playing with AWS Gateway Load balancer

AWS advanced networking, playing with AWS Gateway Load balancer (GWLB).

tag: workshop-gwlb

possible-source

  • https://catalog.workshops.aws/networking/en-US/gwlb

documents-info-blog-posts

https://aws.amazon.com/blogs/networking-and-content-delivery/introducing-aws-gateway-load-balancer-supported-architecture-patterns/

https://aws.amazon.com/elasticloadbalancing/gateway-load-balancer/

poc-with-aws-gateway-load-balancer-gwlb

proof of concept with AWS Gateway Load Balancer GWLB

cd /tmp

curl --silent http://169.254.169.254/latest/dynamic/instance-identity/document > /home/ec2-user/iid;

export instance_interface=$(curl --silent http://169.254.169.254/latest/meta-data/network/interfaces/macs/);

export instance_vpcid=$(curl --silent http://169.254.169.254/latest/meta-data/network/interfaces/macs/$instance_interface/vpc-id);

export instance_az=$(cat /home/ec2-user/iid |grep 'availability' | awk -F': ' '{print $2}' | awk -F',' '{print $1}');

export instance_ip=$(cat /home/ec2-user/iid |grep 'privateIp' | awk -F': ' '{print $2}' | awk -F',' '{print $1}' | awk -F'"' '{print$2}');

export instance_region=$(cat /home/ec2-user/iid |grep 'region' | awk -F': ' '{print $2}' | awk -F',' '{print $1}' | awk -F'"' '{print$2}');

export gwlb_ip=$(aws --region $instance_region ec2 describe-network-interfaces --filters Name=vpc-id,Values=$instance_vpcid | jq ' .NetworkInterfaces[] | select(.AvailabilityZone=='$instance_az') | select(.InterfaceType=="gateway_load_balancer") |.PrivateIpAddress' -r);
  • Start httpd and configure index.html
systemctl start httpd;
touch /var/www/html/index.html;
echo > /var/www/html/index.html;
echo "<html>" >> /var/www/html/index.html
echo "  <head>" >> /var/www/html/index.html
echo "    <title>Gateway Load Balancer POC</title>" >> /var/www/html/index.html
echo "    <meta http-equiv='Content-Type' content='text/html; charset=ISO-8859-1'>" >> /var/www/html/index.html
echo "  </head>" >> /var/www/html/index.html
echo "  <body>" >> /var/www/html/index.html
echo "    <h1>Welcome to Gateway Load Balancer POC:</h1>" >> /var/www/html/index.html
echo "  </body>" >> /var/www/html/index.html
echo "</html>" >> /var/www/html/index.html
  • Start and configure iptables
systemctl enable iptables;
systemctl start iptables;
  • Configuration below allows all traffic
# Set the default policies for each of the built-in chains to ACCEPT:
iptables -P INPUT ACCEPT;
iptables -P FORWARD ACCEPT;
iptables -P OUTPUT ACCEPT;
  • Flush the nat and mangle tables, flush all chains (-F), and delete all non-default chains (-X):
iptables -t nat -F;
iptables -t mangle -F;
iptables -F;
iptables -X;
  • Configure nat table to hairpin traffic back to GWLB
iptables -t nat -A PREROUTING -p udp -s $gwlb_ip -d $instance_ip -i eth0 -j DNAT --to-destination $gwlb_ip:6081;
iptables -t nat -A POSTROUTING -p udp --dport 6081 -s $gwlb_ip -d $gwlb_ip -o eth0 -j MASQUERADE;
  • Save iptables
    service iptables save;
    
    iptables -L -n
    

antonio-feijao-uk

Thank you, and happy learning.

Antonio Feijao UK

AWS Systems Manager or AWS SSM to create a private Networking tunnel to resources in the private subnet

AWS Systems Manager or AWS SSM to create a private Networking tunnel to resources in the private subnet

Pre-requisit

you need the AWS SSM agent installed on your laptop/desktop - documentation here https://docs.aws.amazon.com/systems-manager/latest/userguide/ssm-agent.html

AWS SSM create a tunnel to Linux instance in an AWS private subnet

1) Assume a role in the account

2) Get the instance ID you want to tunnel to

3) Start a session with AWS SSM agent

Sample commands for creating a tunnel to the instance on port 3389 and my PC/laptop localhost on port 5222

# Using a variable, so easier to reuse the command

instance_id="i-Xxxxxx"


# Sample command for creating a tunnel to the instance on port 22 and my PC/laptop localhost on port 5222

aws ssm start-session --target ${instance_id} \
    --document-name AWS-StartPortForwardingSession \
    --parameters portNumber="22",localPortNumber="5222" \
    --region eu-west-2

After creating the tunnel to the instance, you still need a valid ssh key to ssh into the ec2 instance.

Via the SSM in the console, you could add your public key to the authorized-keys - where is another website explaning that https://www.ssh.com/academy/ssh/authorized-keys-file


Example using AWS SSM to create a private networking tunnel to use as remote desktop into a Windows instance in a private subnet

Sample command for creating a tunnel to the instance on port 3389 and my PC/laptop localhost on port 5222

Same step above 1) and 2)

3) Create the tunnel with the RDP port as a destination portNumber

# Using a variable, so easier to reuse the command

instance_id="i-Xxxxxx"


# Sample command for creating a tunnel to the instance on port 22 and my PC/laptop localhost on port 5222

aws ssm start-session --target ${instance_id} \
    --document-name AWS-StartPortForwardingSession \
    --parameters portNumber="3389",localPortNumber="5222" \
    --region eu-west-2

Now, using your favourity remote destop application, you can RDP to localhost:5222 which will be tunneled into the Windows instance in the private subnet on port 3389.


Additional documentation

  • "Port Forwarding Using AWS System Manager Session Manager"

https://aws.amazon.com/blogs/aws/new-port-forwarding-using-aws-system-manager-sessions-manager/

  • "... Tunnel through AWS Systems Manager to access my private VPC resources"

https://aws.amazon.com/premiumsupport/knowledge-center/systems-manager-ssh-vpc-resources/

yum-provide-which-package-contains-the-command

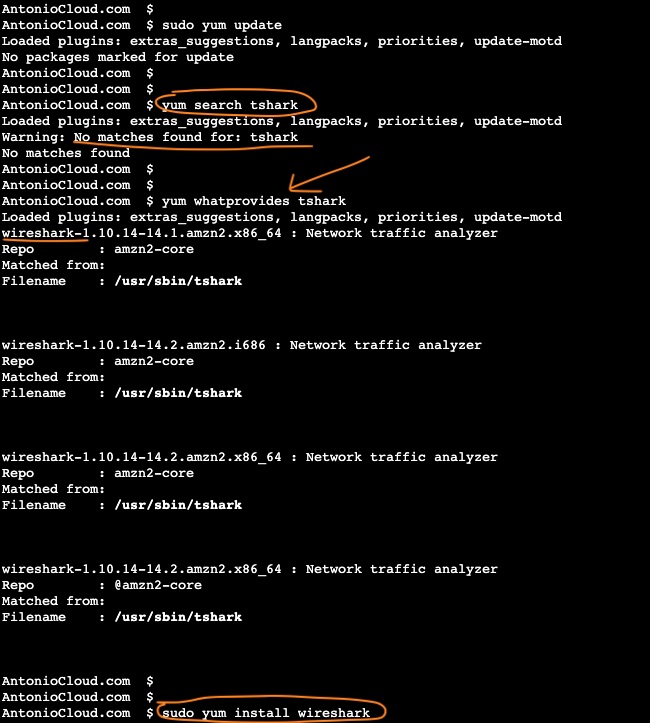
See how to find the package you will need to install for the command you are looking for. Example, I was looking for the tshark command, but a simple yum search tshark was not returning any results. See how I found the linux command.

I ran this on a EC2 instances Amazon Linux v2, I wanted to run the command tshark but this was not available.

So, I searched for it with yum search tshark and package was not found.

A did quick research online and found in here a command that almost got forgotten!

yum whatprovides {COMMAND}

I decided to write this article to remind me of this command and it might be useful for you too.

yum whatprovides tshark

Try with other commands. Was this useful to you?


Happy learning

Antonio Feijao UK

raspberry-pi-as-a-router-nat

Transform to run as a router and NAT device

Finally! This project is now documented here - https://antonio.cloud/projects/linux/raspberry-pi/raspberry-pi-router-access-point-dns-block-ads-vpn/

Important

Below are notes from my old post

## the command below required sudo

echo "-----------------------"
echo "Shows the configs before changes..."

sysctl net.ipv4.ip_forward net.ipv4.conf.eth0.send_redirects

iptables -n -t nat -L POSTROUTING 


echo "-----------------------"
echo "Enabling IPv4 routing packets forward..."

sysctl -q -w net.ipv4.ip_forward=1 net.ipv4.conf.eth0.send_redirects=0


echo "-----------------------"
echo "Enabling routing/PAT with ip tables..."

iptables -t nat -C POSTROUTING -o eth0 -j MASQUERADE 2> /dev/null || iptables -t nat -A POSTROUTING -o eth0 -j MASQUERADE


echo "-----------------------" 
echo "Show configs after changes..."
sysctl net.ipv4.ip_forward net.ipv4.conf.eth0.send_redirects
iptables -n -t nat -L POSTROUTING 


echo "-----------------------"
echo "Routing/NAT configuration completed "

dns-root-zone-database

Internet Assigned Numbers Authority (IANA)

iana.org - iana.org's logo

Loads of good reading at https://www.iana.org/

"The global coordination of the DNS Root, IP addressing, and other Internet protocol resources is performed as the Internet Assigned Numbers Authority (IANA) functions."

  • Domain Names

    • Root Zone Management
    • Database of Top Level Domains
    • .int Registry
    • .arpa Registry
    • IDN Practices Repository
  • Number Resources

    • IP Addresses & AS Numbers
    • Network abuse information
  • Protocol Assignments

    • Protocol Registries
    • Apply for an assignment
    • Time Zone Database

Root Zone Database